Home / How to set up the Infoticker widget for your stream
How to set up the Infoticker widget for your stream
08 Jan 2020 - 16:53
Add the practical Infoticker widget to your stream with the CamOverlay App. With this widget, you can communicate information via text directly in your stream. It’s ideal for uses such as promo events, displaying information about your broadcast, a competition or even informing viewers on how to support a good cause. The steps are easy and are described below.
What do you need?
- An AXIS PTZ camera (check compatibility here)
- The CamStreamer App
- The CamOverlay App
Steps for set-up:
1. Sign into the camera’s web interface, install the CamStreamer App and CamOverlay App in the App section, and buy a license for them at www.camstreamer.com.
Tip: A free 30-day license for both applications can be acquired at the camstreamer.com website; this way you don’t have to pay for the license before you make your settings, allowing you to try it out before purchasing
2. Open the user interface of the CamOverlay App (the link can be found in the Axis camera’s interface; click on the Open button in the Apps tab).
3. In the CamOverlay App, select the preset Info Ticker service. This is the service that makes it possible to depict 3. overlay graphics with a text banner (ticker).
4. The service can be set up in just a few easy steps.
- First set the Video channel (View Area) where the widget should appear and the resolution of the stream that will contain the graphics.
- You can also select from these options:
- Show clock, clock format – if you’d like to depict a clock (12-hour or 24-hour) next to the text banner
- Select Text color, Background color of the Info Ticker
- Number of lines of text (select one or two)
- Switching time – the duration before the text changes (if the whole text does not fit into the Info Ticker)
- Crawl effect – cameras with Artpec-6 and higher processor (check here) allow for moving text
- Weather language, Weather location and Units – set up weather information – you can insert this information into the text with the help of hashtag symbols (see below)
- Font size
- Source type – you can write the text directly in the service’s settings (Own text option) and change it as needed, or you can take the text from an external file in .TXT format and located on a URL address (select the “Remote TXT file on http address” option)
- Tip: the content of the Infoticker can be changed with the help of your API; the command format can be found here.
- Source – enter the text that you want to display here
- The Enter key selects the next line
- Here you can add replacement text in this format #date, #dateus, #time, #timesec, #temperature (current temperature), #sunrise, #sunset, #weathertext (current weather in words)
- Finally, you can set up the Schedule if you want to depict the widget for only a certain duration; if you don’t fill this in, it will be displayed continually.
Click on Save all changes – your widget is now set up!
Tip: Make sure the same resolution is set in the live view as in required outgoing stream. Ideally, the widget should be checked after carrying out the next step, i.e. setting up streaming on the site you’ll be streaming to (e.g. to YouTube or Facebook).
5. Now you can set up the live stream from your camera in the CamStreamer App. You can open its user interface in the upper panel of the CamOverlay App or directly in the camera’s interface. Here you’ll find a number of services with user-friendly settings.
Tip: Descriptions of the settings for the most commonly used services can be found here in our use cases: YouTube integration and Facebook integration.
6. And you’re done! Enjoy your new live stream!
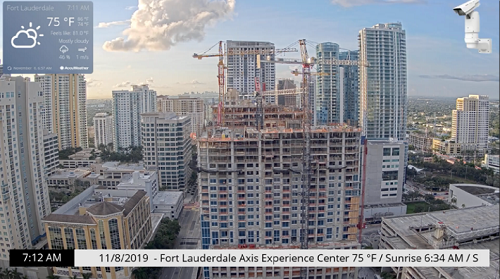
Example of Infoticker
For inspiration, have a look at some of our examples here.
Download the PDF here.
Watch our setup video here.
For more information please contact us.
CamStreamer Team